|
Jetson nanoはアメリカの半導体メーカーであるNVIDIA社が製造・販売をするGPU内蔵のシングルボードコンピューターです。このページでは、NVIDIAが提供している Jetson Nano Developer Kit B01 でコンピュータビジョンの実装する方法について説明します。
画像処理のOSSとして最もシンプルな構造を持つソフトはOpenCV(Open Source Computer Vision)です。 1999年、Intelの Gary Bradskyによって開発され、2000年に発表された。その後、Vadim Pisarevskyたちが加わり、2008年以降、Willow Garageの支援を得て、Open Sourceとして開発が活発に行われてきました。現在、OpenCVのバージョンは4.5です。
OpenCVはコンピュータービジョンライブラリの重要なものの1つであり、ディープラーニング推論を実行するための機能(OpenCV DNN module)も追加されてきた。これを使用して、多くのの深層学習機能を実行できます。各種のフレームワークのモデルをサポートする機能は、現在のバージョンのOpenCVの一部になっています。
自動車の自動運転などに応用されるCaffeのような畳み込みニューラルネットワークの学習済みモデルを用いれば、1000種類以上の画像識別が可能です。さらに、OpenCVでは、Caffeを始めとして、Tensorflow、Pytorch、あるいは、DarknetなどのPython/C++APIで開発されてきたDNNモデルを利用して画像識別や物体検出を実行することが可能になっています。しかし、OpenCVはディープラーニングの学習機能を含んでいないので、そうしたPython/C++APIまでの能力はありません。その代わり、構造はシンプルで、動作は非常に軽く、使いやすいです。Raspberry Pi、Jetson Nano、iOSやAndroidなどをプラットホームとするモバイル機器でも利用できます。
このページでは、Jetson Nanon に OpenCV DNN モジュールを用いたコンピュータビジョンのプログラムを実装する方法を説明します。OpenCVの基本的なTutorialsは、 このopencv-tutorialです。また、DNNモジュールの活用についての説明は、公式サイトのページを参考にして下さい。
Last updated: 2022.5.12
Jetson Nano へのOpenCVなどのインストール |
OpenCV C++バージョンをJetson Nanoにインストールする手続きは若干煩雑です。理由は、Jetson Nano内蔵のGPU活用に必須のCUDA & cuDNNを使用できるようにしなくてはいけないからです。 JetPackにOpenCVをインストールする手続きは、How to use OpenCV DNN Module with NVIDIA GPUs、または、Qengineering/Install-OpenCV-Jetson-Nanoにあります。
ここでは、既にOpenCVがインストールされたイメージファイルを活用することにします。NVIDIAが提供している公式のイメージファイルJetPackはUbuntu16.04の上でPython 3.6がインストールされています。Python 3.8を使用したいので、Ubuntu 20.4にアップグレードされたイメージファイル、具体的には、Q-engineeringが提供しているイメージファイルをダウンロードします。QengineeringのGithubからダウンロードします。このイメージファイルのサイズは約11GBあります。解凍すると、約30GBになります。64GB以上のサイズのmicroSDカードにコピーして下さい。このイメージファイルには以下のソフトがインストールされています。
OSとしてJetPack 4.6.0
OpenCV 4.5.3
TensorFLow 2.4.1
Pytorch 1.9.0
TorchVision 0.10.0
TeamViewer aarch64 15.24.5
Jtop 3.1.2
イメージファイルをmicroSDカードへコピーした後は、Jetson Nanoに挿入して使用します。パスワードは「jetson」です。
例えば、64GBのmicroSDを使用しているとき、64GBのストレージのうち約30GBのみが利用できるサイズとして割り当てられていて、残りの容量は使用できない未割り当てのままです。パーティション管理ソフトGPartedを用いて割り当てストレージを拡大します。
$ sudo apt install gparted
$ gparted
とします。拡張したいパーティション(使用中の約30GBの欄)を右クリックします。リサイズ画面が表示されます。上端のパーティションバーの右端にカーソルを合わせ、右方向にドラッグすることでサイズを調整できます。パーティションサイズが決まったら、右下にある「resize」ボタンをクリックします。(この段階では仮決定なので、処理は実行されません。)「resize」をクリックしたら、画面上部の「チェックマーク(処理の実行)」をクリックすると仮決定した処理が実行されます。
Ubuntuの日本語化をするときは、web上で解説を探して、例えば、Ubuntu20.04の日本語化が参考になります。
OpenCVにおけるDeep Neural Networks (dnn module)の大まかな解説はTutorialsの目次をみて下さい。このtutorial_dnn_googlenet(C++)の解説はとてもわかりにくいので、理解しやすい解説を提供しているDeep Learning with OpenCV DNN Module: A Definitive GuideというLearnOpenCVのサイトを参考にします。
OpenCV DNNモジュールは、多くの一般的なディープラーニングフレームワークをサポートしています。以下は、OpenCV DNNモジュールがサポートするディープラーニングフレームワークです。
Caffe
OpenCV DNNで事前にトレーニングされたCaffeモデルを使用するには、2つのファイルが必要です。
1つは、事前にトレーニングされた重みを含むmodel.caffemodelファイルです。もう1つは、拡張子が.prototxtのモデルアーキテクチャファイルです。これは、すべてのニューラルネットワークレイヤーの定義を含むJSONのような構造を持つプレーンテキストファイルのようなものです。
TensorFlow
事前にトレーニングされたTensorFlowモデルを読み込むには、2つのファイルが必要です。モデルの重みファイルとprotobufテキストファイルです。重みファイルの拡張子は.pbで、事前にトレーニングされたすべてのウェイトを含むprotobuf形式のファイルです。モデル構成は、.pbtxtファイル拡張子を持つprotobufテキストファイルに保持されます。
TorchとPyTorch
Torchモデルファイルをロードするには、事前にトレーニングされたウェイトを含むファイルが必要です。通常、このファイルの拡張子は.t7または.netです。PyTorchの学習済みモデルでは、拡張子が.pth、または、.ptのファイルになっているので、これをONNX形式に変換するのが最善の方法です。ONNXに変換した後、ONNXモデルを読み込みます。
Darknet
OpenCV DNNモジュールは、有名なDarknetフレームワークもサポートしています。
Darknetフレームワークで公式のYOLOモデルを使用している場合が該当します。通常、Darknetモデルをロードするには、Caffeと同様に、モデルを記述した2種類のファイルが必要です。拡張子が.weightsの重みファイルと、ネットワーク構成ファイルである.cfgファイルの二つが必要です。
また、モデルの学習で用いられた画像データの分類を記述したクラスファイルが必要です。画像識別では、ILSVRC2012 classesによる分類が使用され、物体検出では、MS COCOやPascal VOCが採用されています。詳しくは、公式サイトのwikiも参考になります。
OpenCVのgithubサイトの https://github.com/opencv/opencv/ および opencv_extra をダウンロードします。
$ git clone https://github.com/opencv/opencv.git
$ git clone https://github.com/opencv/opencv_extra.git
このパッケージの中にあるデータを使用します。
Jupyter Notebookをインストールしておきます。
$ python3 -m pip install -U pip setuptools
$ python3 -m pip install jupyter notebook
OpenCVが正常にインストールされていることを確認しましょう。OpenCV は/usr/ ディレクトリにインストールされています。
/usr/bin - executable files
/usr/lib/aarch64-linux-gnu - libraries (.so)
/usr/lib/aarch64-linux-gnu/cmake/opencv4 - cmake package
/usr/include/opencv4 - headers
/usr/share/opencv4 - other files
となっています。
OpenCV のインストールチェックをしましょう。以下のC++スクリプトを作成します。
#include <opencv2/core.hpp>
#include <opencv2/imgcodecs.hpp>
#include <opencv2/highgui.hpp>

int main(){
    cv::Mat img;
    img = cv::imread("butterfly.jpg", cv::IMREAD_COLOR);
    cv::namedWindow("image", cv::WINDOW_AUTOSIZE);
    cv::imshow("image", img);
    cv::waitKey(0);
    cv::destroyAllWindows();
    return 0;
}
opencv_test.cpp と名前をつけて保存し、画像(ここでは「butterfly.jpg」ですが、使用する画像)を同じディレクトリに配置します。その後、以下のコマンドを入力してビルドします。
$ g++ opencv_test.cpp -o opencv_test `pkg-config --cflags --libs opencv4`
$ ./opencv_test
画像が表示できれば成功です。
次に、Webcamera からの映像の取り込みができるか確認します。以下のコードを作成して下さい。
//camera.cpp

#include <opencv2/opencv.hpp>

int main(int argh, char* argv[])
{
    cv::VideoCapture cap(2);

    if(!cap.isOpened()) {
        return 0;
    }

    cv::Mat frame; //取得したフレーム
    while(cap.read(frame))//無限ループ
    {
        cv::imshow("webcam", frame);
        const int key = cv::waitKey(1);
        if(key == 'q') {
            break;
        }
    }
    cv::destroyAllWindows();
    return 0;
}
このコードをコンパイルします。
$ g++ -o webcam camera.cpp `pkg-config --cflags --libs opencv4`
$ ./webcam
Webcamera からの映像がリアルタイムでデスクトップに表示されます。OpenCVが正常に動作することが確認できました。
OpenCV DNN を用いたコンピュータビジョン:Caffe編 |
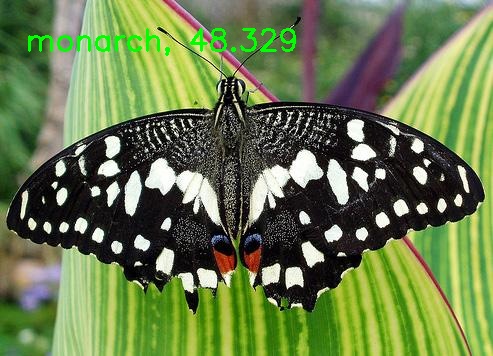
OpenCV DNN でCaffeモデルをロードするためのモジュールはreadNetあるいは、readNetFromCaffe()を用います。画像識別のCaffeモデルを実装するためにDeep Learning with OpenCV DNN Module: A Definitive Guideで提供されているコードを使用してみます。以下がそのPythonスクリプトです。モデルの読み込みは、readNet()を用いて、
model = cv2.dnn.readNet(model='models/DenseNet_121.caffemodel', config='models/DenseNet_121.prototxt', framework='Caffe')
で行われています。readNetFromCaffe()モジュールを利用するときは、
model = cv2.dnn.readNetFromCaffe(caffeModel='models/DenseNet_121.caffemodel',prototxt='models/DenseNet_121.prototxt')
とします。
import cv2
import numpy as np

# read the ImageNet class names
with open('models/classification_classes_ILSVRC2012.txt', 'r') as f:
    image_net_names = f.read().split('\n')
# final class names (just the first word of the many ImageNet names for one image)
class_names = [name.split(',')[0] for name in image_net_names]

# load the neural network model
model = cv2.dnn.readNet(model='models/DenseNet_121.caffemodel', config='models/DenseNet_121.prototxt', framework='Caffe')

# load the image from disk
image = cv2.imread('images/butterfly.jpg')
# create blob from image
blob = cv2.dnn.blobFromImage(image=image, scalefactor=0.01, size=(224, 224),
mean=(104, 117, 123))
# set the input blob for the neural network
model.setInput(blob)
# forward pass image blog through the model
outputs = model.forward()

final_outputs = outputs[0]
# make all the outputs 1D
final_outputs = final_outputs.reshape(1000, 1)
# get the class label
label_id = np.argmax(final_outputs)
# convert the output scores to softmax probabilities
probs = np.exp(final_outputs) / np.sum(np.exp(final_outputs))
# get the final highest probability
final_prob = np.max(probs) * 100.
# map the max confidence to the class label names
out_name = class_names[label_id]
out_text = f"{out_name}, {final_prob:.3f}"

# put the class name text on top of the image
cv2.putText(image, out_text, (25, 50), cv2.FONT_HERSHEY_SIMPLEX, 1, (0, 255, 0),
2)
cv2.imshow('Image', image)
cv2.waitKey(0)
cv2.imwrite('result_image.jpg', image)
このスクリプトを classify.py として保存して下さい。ここで使用したCaffeモデルの2種類のファイルは、DenseNet_121.caffemodel、DenseNet_121.prototxtです。classification_classes_ILSVRC2012.txtは、OpenCVのGithub:opencv/opencv/samples/data/dnn/にあります。使用する画像は適当に用意して下さい。ディレクトリの構造は以下のようにします。
.
├──
├── classify.py
├── detect_cam.py
├── detect_img.py
├── images
│   ├── butterfly.jpg
│   ├── dog.jpg
│   └── tiger.jpg
├── models
│   ├── DenseNet_121.caffemodel
│   ├── DenseNet_121.prototxt
│   ├── classification_classes_ILSVRC2012.txt
│   ├── object_detection_classes_coco.txt
│   └── yolov5s.onnx
$ python3 classify.py
と実行すると、以下の画像がポップアップします。「q」キーを押すと画像は消えます。
OpenCV DNN を用いたコンピュータビジョン:Tensorflow編 |
Tensorflowの学習済みモデルを利用したOpenCVの活用について、公式サイトのDeep Neural Networks (dnn module)のwikiに沿って説明します。このチュートリアルでは、TensorFlow(TF)分類モデルの凍結グラフを用いた物体検出の実行手順を説明しています。ただし、Tensorflowのコードがtensorflow 1.x の仕様になっていますので、tensorflow 2.xで実行するとエラーが出ます。
Tensorflowの学習済みモデルのダウンロード先は上記のDeep Neural Networks (dnn module)のwikiのページに記述されています。このサイトからダウンロードしたファイルを解凍して、その中の「frozen_inference_graph.pb」をmodels/ディレクトリに配置します。ssd_mobilenet_v2_coco_2018_03_29.pbtxtをダウンロードします。'ssd_mobilenet_v2_coco_2018_03_29.pbtxt'ファイルをmodels/ディレクトリに配置し、さらに、任意の画像sample.jpgをimages/ディレクトリ配置します。
次に、以下のpythonスクリプトを作成して、opencv_dnn.pyとして保存して下さい。
import cv2 as cv

cvNet = cv.dnn.readNetFromTensorflow('models/frozen_inference_graph.pb', 'models/ssd_mobilenet_v2_coco_2018_03_29.pbtxt')

img = cv.imread('images/dog.jpg')
rows = img.shape[0]
cols = img.shape[1]
cvNet.setInput(cv.dnn.blobFromImage(img, size=(300, 300), swapRB=True, crop=False))
cvOut = cvNet.forward()

for detection in cvOut[0,0,:,:]:
    score = float(detection[2])
    if score > 0.3:
        left = detection[3] * cols
        top = detection[4] * rows
        right = detection[5] * cols
        bottom = detection[6] * rows
        cv.rectangle(img, (int(left), int(top)), (int(right), int(bottom)), (23, 230, 210), thickness=2)

cv.imshow('img', img)
cv.waitKey()
このファイルを引数なしで実行すると、検出された物体に枠がついた画像が表示されます。このスクリプトでは物体名が表示されていないので、物体名を表示させます。以下のスクリプトを作成して下さい。detect_img.pyというファイル名で保存して下さい。
import cv2
import numpy as np

# load the COCO class names
with open('models/object_detection_classes_coco.txt', 'r') as f:
    class_names = f.read().split('\n')

# get a different color array for each of the classes
COLORS = np.random.uniform(0, 255, size=(len(class_names), 3))

# load the DNN model
model = cv2.dnn.readNet('models/frozen_inference_graph.pb', 'models/ssd_mobilenet_v2_coco_2018_03_29.pbtxt','tensorflow')

# read the image from disk
image = cv2.imread('images/dog.jpg')
image_height, image_width, _ = image.shape
# create blob from image
blob = cv2.dnn.blobFromImage(image=image, size=(300, 300), crop=False,
                             swapRB=True)
# create blob from image
model.setInput(blob)
# forward pass through the model to carry out the detection
output = model.forward()

# loop over each of the detection
for detection in output[0,0]:
    # extract the confidence of the detection
    confidence = detection[2]
    # draw bounding boxes only if the detection confidence is above...
    # ... a certain threshold, else skip
    if confidence > .6:
        # get the class id
        class_id = detection[1]
        # map the class id to the class
        class_name = class_names[int(class_id)-1]
        color = COLORS[int(class_id)]
        # get the bounding box coordinates
        box_x = detection[3] * image_width
        box_y = detection[4] * image_height
        # get the bounding box width and height
        box_width = detection[5] * image_width
        box_height = detection[6] * image_height
        # draw a rectangle around each detected object
        cv2.rectangle(image, (int(box_x), int(box_y)), (int(box_width), int(box_height)), color, thickness=2)
        # put the FPS text on top of the frame
        cv2.putText(image, class_name, (int(box_x), int(box_y - 5)), cv2.FONT_HERSHEY_SIMPLEX, 1, color, 2)

cv2.imshow('image', image)
cv2.imwrite('image_result.jpg', image)
cv2.waitKey(0)
cv2.destroyAllWindows()
物体検出のためのクラス分類はcoco分類を使用するので、object_detection_classes_coco.txtファイルを用意します。このクラス分類ファイルをmodels/ディレクトリに配置します。object_detection_classes_coco.txtファイルは、OpenCVのgithubサイトの https://github.com/opencv/opencv/の中の、samples/data/dnn/にあります。
ファイル構成の構造は以下の通りです。
.
├── detect_cam.py
├── detect_img.py
├── images
│   ├── dog.jpg
│   ├── output.jpg
│   └── street.jpg
├── models
│   ├── frozen_inference_graph.pb
│   ├── object_detection_classes_coco.txt
│   └── ssd_mobilenet_v2_coco_2018_03_29.pbtxt
├── opencv_dnn.py
└── tf_object_detection.py
このpythonコードを実行すると物体名が表示されます。物体の名称はCOCOのデータ分類の90種類です。
webcamからのライブ映像での物体検出を行うときは、以下のスクリプトを作成して、opencv_cam.pyとして保存して下さい。
import cv2
import time
import numpy as np

# load the COCO class names
with open('models/object_detection_classes_coco.txt', 'r') as f:
    class_names = f.read().split('\n')

# get a different color array for each of the classes
COLORS = np.random.uniform(0, 255, size=(len(class_names), 3))

# load the DNN model
model = cv2.dnn.readNet('models/frozen_inference_graph.pb','models/ssd_mobilenet_v2_coco_2018_03_29.pbtxt', 'tensorflow')

# capture the video
cap = cv2.VideoCapture(2)
# get the video frames' width and height for proper saving of videos
frame_width = int(cap.get(3))
frame_height = int(cap.get(4))

# detect objects in each frame of the video
while cap.isOpened():
    ret, frame = cap.read()
    if ret:
        image = frame
        image_height, image_width, _ = image.shape
        # create blob from image
        blob = cv2.dnn.blobFromImage(image=image, size=(300, 300), mean=(104, 117, 123),
                                     swapRB=True)
        # start time to calculate FPS
        start = time.time()
        model.setInput(blob)
        output = model.forward()
        # end time after detection
        end = time.time()
        # calculate the FPS for current frame detection
        fps = 1 / (end-start)
        # loop over each of the detections
        for detection in output[0, 0, :, :]:
            # extract the confidence of the detection
            confidence = detection[2]
            # draw bounding boxes only if the detection confidence is above...
            # ... a certain threshold, else skip
            if confidence > .4:
                # get the class id
                class_id = detection[1]
                # map the class id to the class
                class_name = class_names[int(class_id)-1]
                color = COLORS[int(class_id)]
                # get the bounding box coordinates
                box_x = detection[3] * image_width
                box_y = detection[4] * image_height
                # get the bounding box width and height
                box_width = detection[5] * image_width
                box_height = detection[6] * image_height
                # draw a rectangle around each detected object
                cv2.rectangle(image, (int(box_x), int(box_y)), (int(box_width), int(box_height)), color, thickness=2)
                # put the class name text on the detected object
                cv2.putText(image, class_name, (int(box_x), int(box_y - 5)), cv2.FONT_HERSHEY_SIMPLEX, 1, color, 2)
                # put the FPS text on top of the frame
                cv2.putText(image, f"{fps:.2f} FPS", (20, 30), cv2.FONT_HERSHEY_SIMPLEX, 1, (0, 255, 0), 2)

        cv2.imshow('image', image)
        if cv2.waitKey(10) & 0xFF == ord('q'):
            break
    else:
        break

cap.release()
cv2.destroyAllWindows()
$ python opencv_cam.py
と実行すると、webcamからのライブ映像の物体検出の動画がポップアップします。
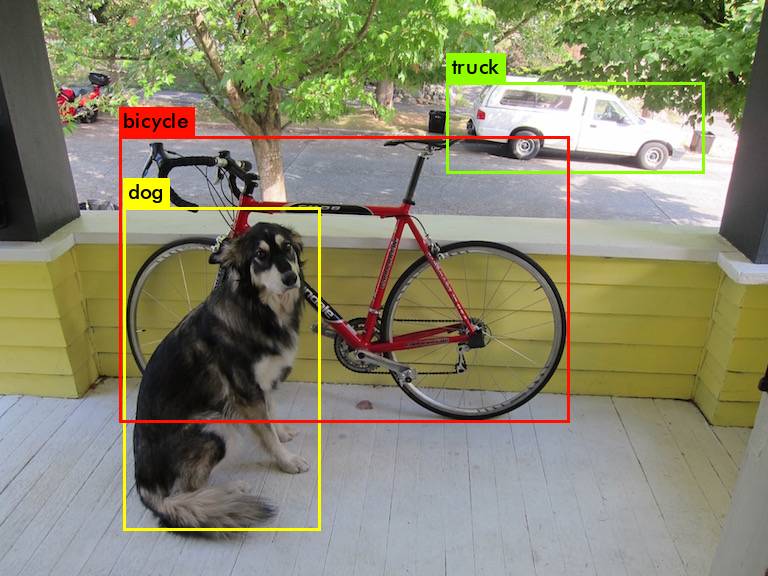
公式ページのtutorialsで提供されているpythonコードを利用するケースについて説明します。
opencv/samples/dnn/の中に配置されている329行のpythonスクリプトで、object_detection.pyというファイルを使用します。opencv/samples/dnn/ディレクトリ内に、上の例で使用した学習済みモデルのfrozen_infrence_graph.pb と ssd_mobilenet_v2_coco_2018_03_29.pbtxt を配置して
$ cd opencv/samples/dnn
$ python3 object_detection.py --model frozen_inference_graph.pb --config ssd_mobilenet_v2_coco_2018_03_29.pbtxt --input sample.jpg --width 300 --height 300 --classes ../data/dnn/object_detection_classes_coco.txt
と実行します。画像sample.jpg(ここでは、dog.jpg)は自身で用意して、実行するディレクトリに配置して下さい。検出枠の色が異なりますが、下の画像のようなポップアップ表示が出ます。
Webcamからのライブ映像で物体検出を行う場合は、--input /dev/video2 というオプションを使用して、
$ python3 object_detection.py --model frozen_inference_graph.pb --config ssd_mobilenet_v2_coco_2018_03_29.pbtxt --width 300 --height 300 --classes ../data/dnn/object_detection_classes_coco.txt --input /dev/video2
と入力します。
OpenCV DNN を用いたコンピュータビジョン:Darknet編 |
次に、Darknetモデルを用いた物体検出の例を見てみましょう。Darknet関連の学習済みモデルのcfgとweightsファイルは、pjreddie.com/darknet/yolo/からダウンロードできます。
$ wget https://pjreddie.com/media/files/yolov3.weights
$ wget https://pjreddie.com/media/files/yolov3-tiny.weights
yolov3モデルを用いたOpenCV DNNの利用の方法を公式サイトに掲載されたコードとは別のコードで実行してみます。解説記事:object-detection-using-yolov3-and-opencvを参考にします。使用するコードを
$ git clone https://github.com/nandinib1999/object-detection-yolo-opencv.git
とダウンロードします。このフォルダー内のyolo.pyを実行します。yolo.pyの内容は以下の通りです。
このスクリプトを実行するためには、Yolov3の学習済みモデル、yolov3.weightsとyolov3.cfgファイル、および、分類分けクラスを記述したcoco.namesが必要です。実行用のディレクトリは以下のような構造にして下さい。
.
├── coco.names
├── images
│   ├── bicycle.jpg
│   ├── busy_street.jpg
│   └── dog.jpg
├── videos
│   ├── car_on_road.mp4
│   └── pedestrians.mp4
├── yolo.py
├── yolov3.cfg
├── yolov3.weights
├── yolov3-tiny.cfg
└── yolov3-tiny.weights
上のダウンロードしたDarknetの学習済みモデルのyolo3.weightsとyolo3.cfg ファイルをyolo.pyと同じディレクトリ配置して下さい。coco.namesというクラス分けの分類ファイルも用意して下さい。このcoco.namesの中身は、OpenCVの公式Githubからダウンロードしたファイル「/data/dnn/object_detection_classes_coco.txt」と同じです。yolo.pyの#Load yoloでは、"yolov3.weights"と"yolov3.cfg"を読み込む必要があるので、以下のように修正されていることを確認して下さい。
#Load yolo
    def load_yolo():
    net = cv2.dnn.readNet("yolov3.weights", "yolov3.cfg")
    classes = []
    with open("coco.names", "r") as f:
        classes = [line.strip() for line in f.readlines()]

    output_layers = [layer_name for layer_name in net.getUnconnectedOutLayersNames()]
    colors = np.random.uniform(0, 255, size=(len(classes),3))
    return net, classes, colors, output_layers
イメージファイルを用いて物体検出を行うときは、以下のコマンドを実行します。
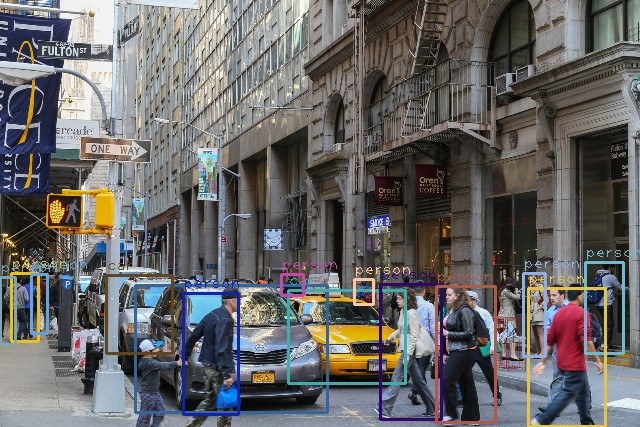
$ python3 yolo.py --image=True --image_path="images/busy_street.jpg"
ビデオファイルを用いて物体検出を行うときは、以下のコマンドを実行します。
$ python3 yolo.py --play_video=True --video_path='videos/pedestrians.mp4'
webcamからのライブ映像で物体検出を行うときは、以下のコマンドを実行します。
$ python3 yolo.py --webcam=True
以上のコマンドは正常に作動するはずです。ただし、上述のssd-mobilenetに比較して、検出精度は高いですが、処理スピードはかなり遅いです。Jetson Nanoを用いた実用には適していません。yolo3-tiny.cfg とyolo3-tiny.weightsの組み合わせで実行すると、推論スピードは高速化しますが、検出精度は悪化します。
Jetson Nano Mouse ロボットの操作:JetBot